Portable Client Generator
TSplus creates by default an icon for the Portable Client Generator:
![]()
It can also be accessed in the Sessions tab of the AdminTool:
It enables you to create 2 types of connection clients which can be copied to the users' Desktop or onto a USB stick for portable use.
Note: Connection Clients are not compatible with Mac computers.
Since TSplus 11.40 release, the client generator has been redesigned to be numerically signed and to avoid false/positive antiviruses reactions.
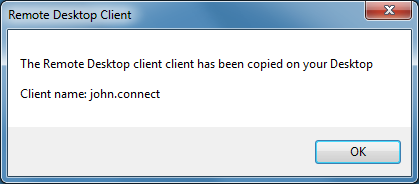
Instead of a ".exe" program, the new Client Generator is creating a flat encrypted file with the extension ".connect":
![]()
Pre-requisite on Client Side
On client side, each user will have to run a signed program named "Setup-ConnectionClient.exe” as a pre-requisite. This program is available on your server, in the TSplus program folder: TSplus\Clients\WindowsClient:

or on the TSplus\Clients\www folder:
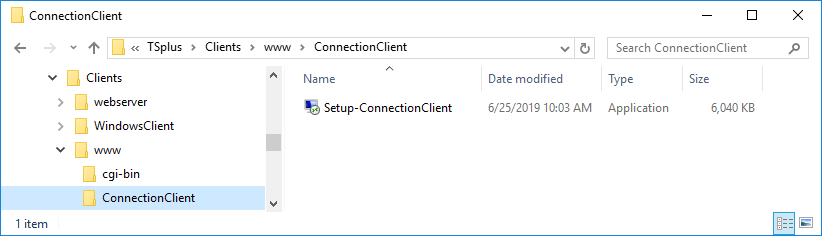
or by downloading it.
Detailed Overview
Click on a tab to go to the corresponding information:
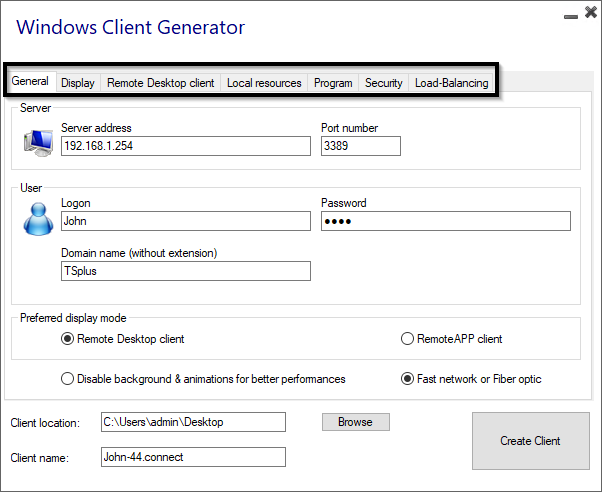
Main window - General Settings
When you launch the client generator, the first tab displayed is the general tab, Here you will find all of the essential connection settings that you need to get you started.
Server Address: Enter the IP address of the server you would like the client to connect to.
Port Number: Enter the server port number. The default is 3389.
Username and Password: If you enter a username and password, the client program will not ask the user to retype it at each session.
To reset this logon/password saving, you must create and edit a shortcut of the Remote Desktop Client and add the -reset on switch at the end of the target field.
Credentials
- If you don't want to save credentials, enter "nosavecredential" in the logon field of the Portable Client Generator.
- If you don't want to display the logon window with the user name, password and domain name, simply enter "nopassword" on the password field.
- If you want to enable autologon, enter *SSO in the username field, the client program will just ask for username and password during the very first connection. It will save this information on the user's workstation so that the user doesn't have to identify himself ever again.
- If you want the current local user's name to be displayed as a logon for the session, enter **, or %USERNAME% in the logon field.
Domain name: Enter a domain name if any.
Preferred Display Mode: You can choose your preferred Display Mode from the following options:
The Classic Remote Desktop, displaying your remote session environment.
The Microsoft RemoteApp connection client, to display your remote applications as if they were installed locally. It has a better graphic performance over minimized applications.
Network speed: You can choose between two options depending on your network speed:
- Disable background display & graphic animations for low speed networks.
- Enable background display and graphic animations for fiber optic or fast network.
Client location: Define the location of your generated client.
- Client name: You can name your client as you wish.
Display
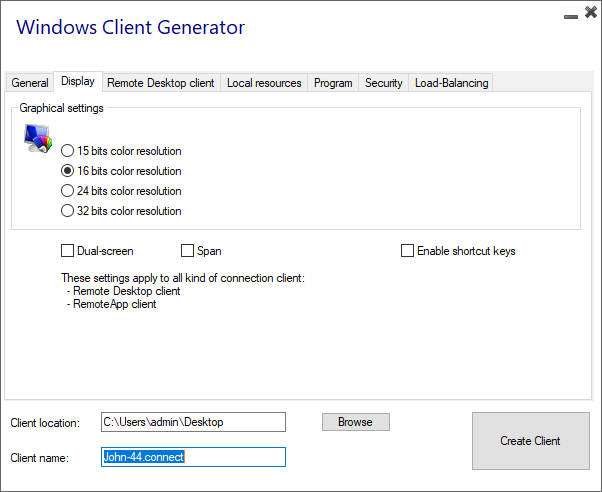
On this tab, you can change the color and the session screen resolution.
You can also adapt your session for dual-screens, with or without span. The span option allows you to stretch your session across both screens.
You can allow the use of the TAB key in the session.
Remote Desktop Client features
On this tab, you can choose which resolution you want to enable for the user:
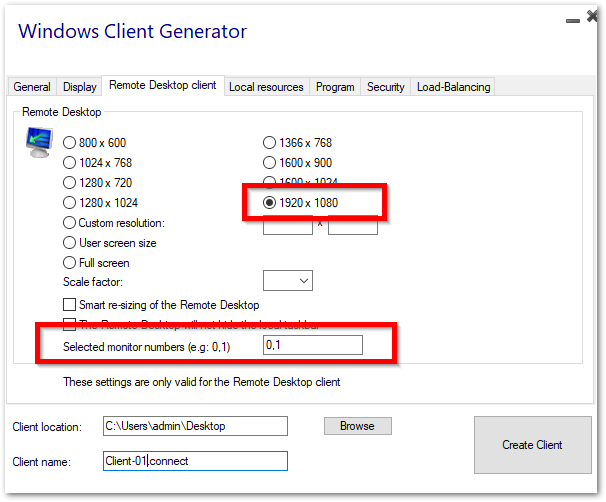
You can check the boxes to enable smart-sizing of the Remote Desktop, and if you want the Remote Desktop not to hide or overlap the local taskbar.
Screen selection option
This allows you to indicate the monitors you want to use for the RDP session. The field must be filled with the list of screen numbers to use (separated by a comma, a space or a semicolon)
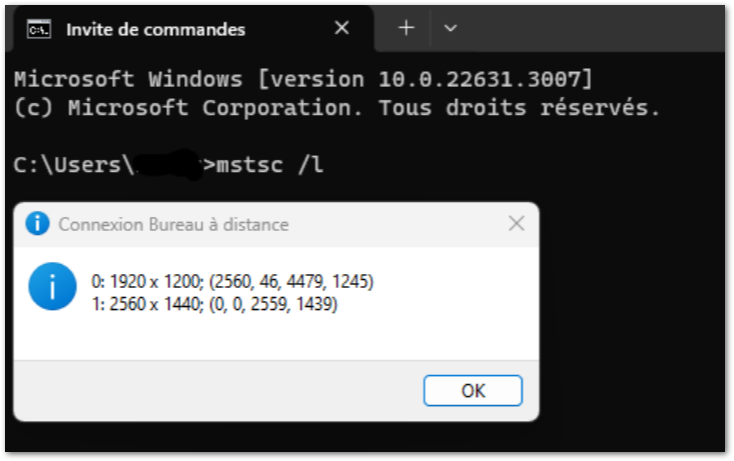
To identify the screen numbers, simply run the command "mstsc /l"
Local Resources
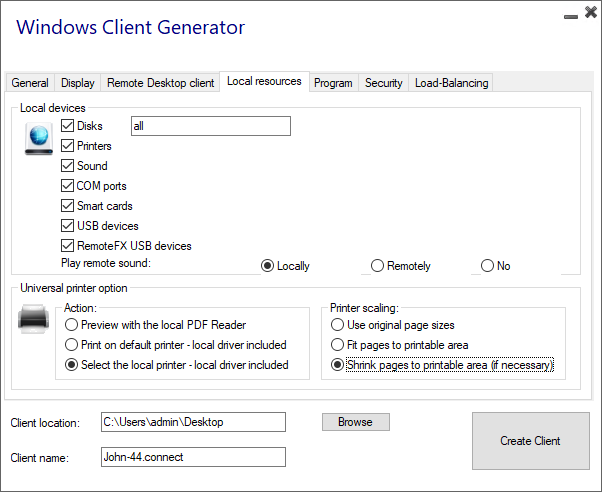
The local resources tab gathers all the devices that you may redirect in your remote session.
The editable field next to the disks box allows to specify which disks are available in the remote session.
You just have to separate each letter of disk (C :, E: ...) by a comma.
When the disks box is ticked and no disk is specified, all the disks are included in the remote session.
Printers correspond to LPT ports, and COM Ports correspond to Serial Ports. Since TSplus 11.50 version, these local devices are selected by default.
Below, you can choose your option for printing, with the universal printer:
- Local PDF Reader preview: The document will be rendered as a PDF and the local Acrobat Reader will open the file. The user can print it, or save a copy on his local disk drive.
- Print on the user's default printer: the document will be automatically pushed to the user's default printer (the local print driver is included in the TSplus connection client).
- Select a local printer: The user can select one of his local printers (the local print driver is included in the TSplus connection client).
If you do not have a PDF Reader installed on your machine, we recommend the use of Foxit Reader.
Program
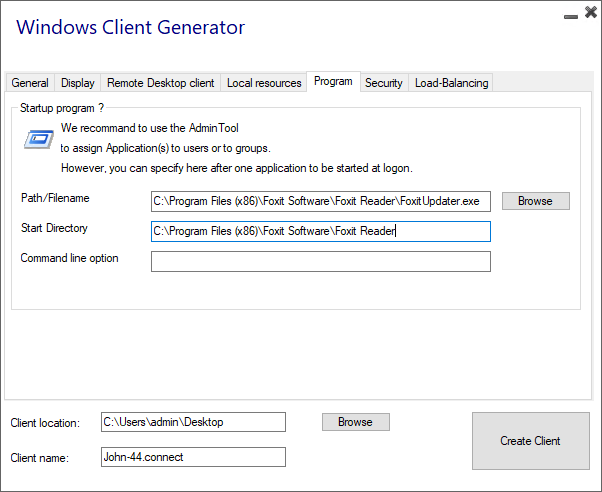
You can set a startup application via the Portable Client Generator, and specify its path, directory and parameters, since the 11.30 release.
However, we recommend you to use the AdminTool to assign the desired applications.
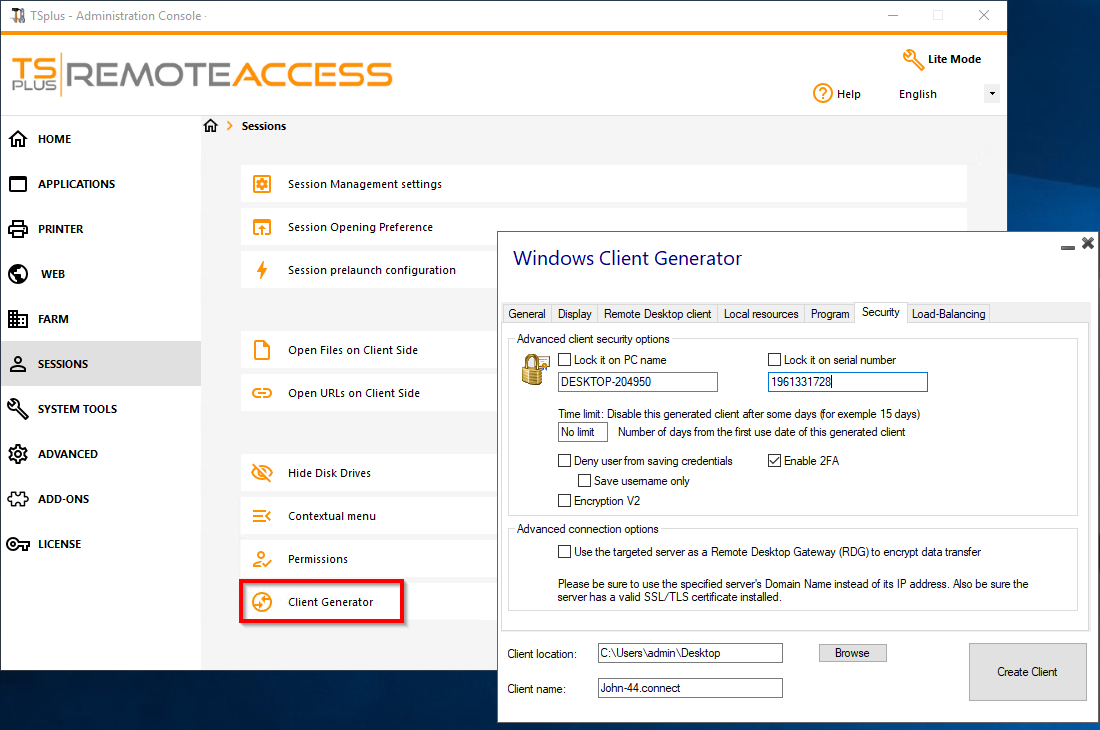
Security
TSplus offers two extra layers of physical security to keep your users' connections safe.
The connection can be locked to the ID of a USB key, locked to a computer name, or you can use both layers of security simultaneously.
Advanced client security option
- If locked to a USB key, the user can initiate a connection from any qualifying windows computer by inserting the USB key and using the connection program placed there by the administrator.
- If locked to a computer name, the user can only successfully connect from the computer whose name has been registered with the server for that user's portable client connection. If both security options are used, the user is limited to connecting from their specific device and only if the correct pre-configured USB key is in place.
In order to lock a connection client onto a USB key you can do so by copying the client generator located in : C:\Program Files (x86)\TSplus\Clients\WindowsClient
Now double click on the client generator and check the lock on serial number box located on the security tab. Once it is done, you can delete the client generator from the USB key.
The newly generated connection client will be placed on the desktop, don't forget to copy it back to the USB key! You can delete the client generator that you copied on the USB key afterwards.
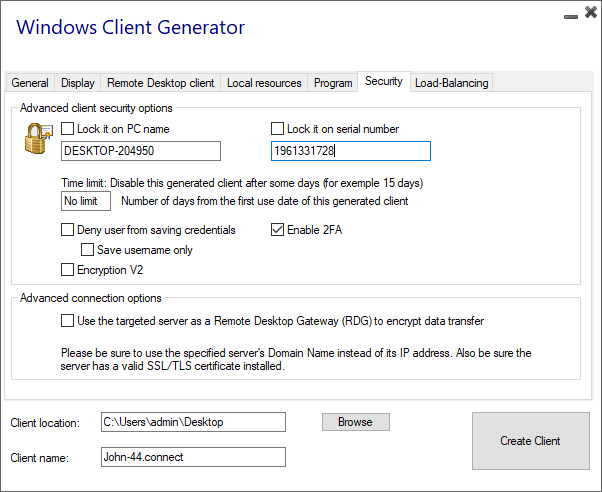
You can define the time limit from the first use date of a generated client by entering the value on the time limit box. (which is by default set to "no limit").
Boxes below enable you to:
- Not display the ability to save credentials for a generated client.
- Save username only.
- Use Encryption V2.
- Not display the ability to save credentials for a generated client.
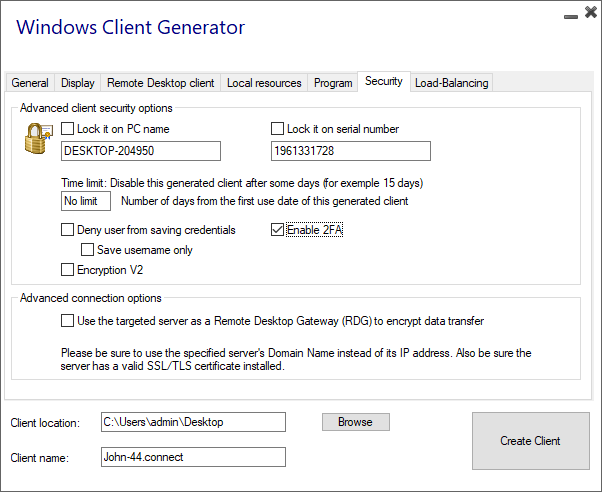
Support for two-factor authentication
The client generator supports two-factor authentication since version 15.30.3.15. Two-factor authentication support also requires a Mobile Web edition or greater.
Please refer to Two-factor Authentication documentation page for more information on how to configure and enable two-factor autnentication for users and groups on your TSplus Remote Access installation.
Please note the following additional requirements to enable two-factor authentication for a generated client:
- Connection Client validates the authentication code against the Web Portal using the HTTPS port. Therefore, Web portal must be up-and-running and reachable through its HTTPS port from the client machine.
- If the HTTPS port of the Web portal is modified, then the generated clients enabled for two-factor authentication must be generated again. Previously generated clients will fail to validate any two-factor authentication.
Since version 15.30.3.15, any previously generated client and any new client generated without 2FA support enabled will behave the same as before. If a user enabled for two-factor authentication attempts to login using a client generated without explicit 2FA support, the login will be denied as two-factor authentication is not possible and therefore will fail.
To add support for two-factor authentication, check the Enable 2FA checkbox before generating your client file. As a result, two-factor authentication will be validated when connecting to the Remote Access application server. If two-factor authentication is enabled on the application server and the connecting user is not configured, then the connection will be denied.
Be mindful that adding 2FA support to a generated client later is not supported. For example, adding 2FA support through command line against the generated .connect file is not supported.
Once a user has configured his account in an authenticator app, he or she will be able to connect using its password and the code provided by its authenticator app or by SMS.

Advanced connection option
If the targeted server possesses a specific and accessible domain name, as well as a valid SSL/TLS certificate installed, you can enable the "Use the targeted server as a Remote Desktop Gateway (RDG) to encrypt data transfer".
This option makes the RDP data transfer during the connection encrypted using TLS encapsulation, making it a suitable alternative to any VPN in term of data encryption.
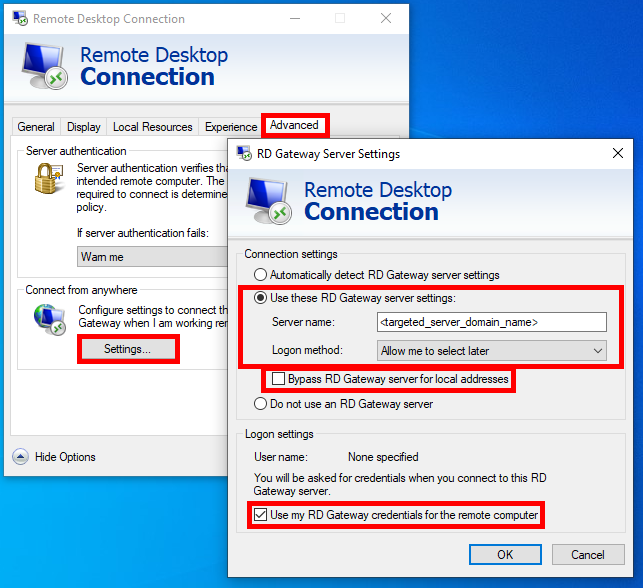
Use mstsc instead to connect to the RD Gateway
You can also use this feature through mstsc configuration without using a generated client if the prerequisites mentionned above are met.
To do so, go to the advanced tab first, then on the "Connect from anywhere" section click on "Settings" and configure the Remote Desktop Gateway by :
- Ticking the "Use these RD Gateway server settings" option
- Replacing the server name with the targeted server domain name (without https://)
- Selecting the Logon method "Allow me to select later"
- Unticking the "Bypass RD Gateway server for local addresses" option
- Ticking the "Use my RD Gateway credentials for the remote computer" option
- Clicking "OK" to save these settings
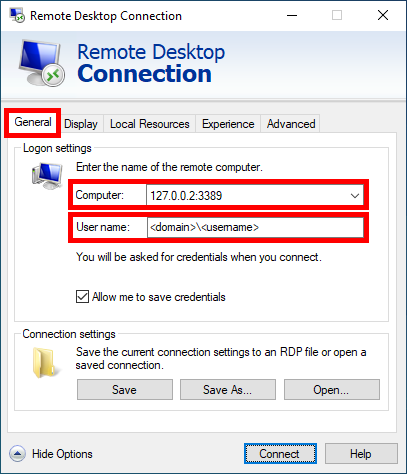
Then go to the "General" tab, and :
- Replace the computer name with "127.0.0.2:3389", and change the port "3389" if you are using a different one
- Replace the username with the username you want to connect with (important: specifying the domain is mandatory)
- Clicke on "Connect"
Load-Balancing
You can also enable the Load Balancing to connect to one server of your farm.
Do not check the "Use Load-Balancing" box if you did not activate the Load-Balancing feature on your server.
You will need to enter the Gateway Web port, which should be the same as the default web port used on all the servers of your farm.

Client Customization is possible. See the corresponding documentation on how to modify the client's icon and edit or delete its parameters.
Logs for Connection Client
You can enable the logs for Connection Client on the client side by adding the following registry key:
[HKEYLOCALMACHINE\SOFTWARE\Digital River\ConnectionClient] "Debug"="true"
The logs are located in C:\Users\