Advanced printing option: Universal Printer
The TSplus Universal Printer allows you to print documents from any PC or mobile device.
See the video tutorial to print with the Universal Printer.
Universal Printer Manager
Since the release of TSplus version 12, the Universal Printer Manager has its own tab:
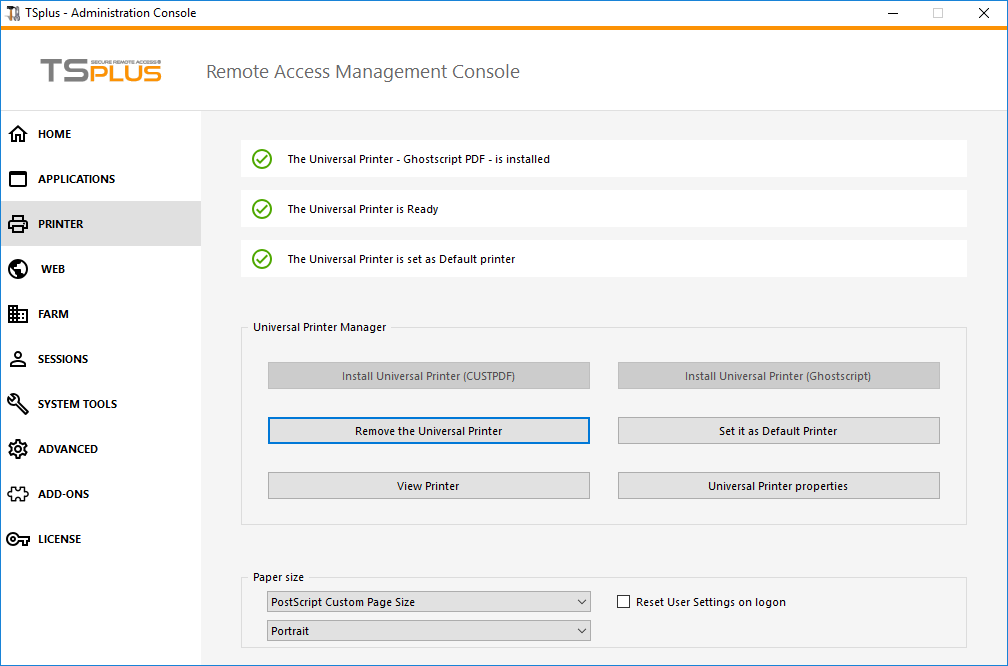
The Universal Printer Manager gathers all the required tools to install, uninstall, display and handle the Universal Printer options.
This tool enables administrators to help users with dynamic printing requirements.
Information can be found at the top concerning the current universal printer status: You can check if the newest version, which uses GhostScript, is installed. You can see if the printer is ready. And you can verify that the printer is set to default.
The Buttons below allow you to:
- Install the Universal Printer (which uses CUSTPDF), which is the old printer, before TSplus version 9 .
- Install the New Universal Printer (which uses Ghostscript), which is more stable with more printing format support.
- Remove the Universal Printer.
- Set it as default printer.
- View Printer: Opens a window where you can see the status of your printing documents, pause, resume or cancel the print job.. You can also set your printing preferences and properties.
- Universal Printer Properties: Opens this window, where you can see all the printing properties. After the General Tab, there are tabs for sharing, ports, advanced, color management, security and device settings.

- Below, you can set the Paper size for printing from A4 to any kind of printing format. (See Customize page format printing for the PostScript Custom Page Size).
- You can also choose between 2 printing formats: Portrait and Landscape.

The "Reset User Settings on Logon" box allows to force the default format of the Universal Printer to the one selected in the AdminTool into each user's new session . If this box is not ticked, during its first session, the user will have the format selected by the AdminTool as default format, but if he chooses another default format, then it is the one which will be kept for its next session.
Printing with the Universal Printer
When selecting this printer, the document to print is automatically converted into a PDF file:
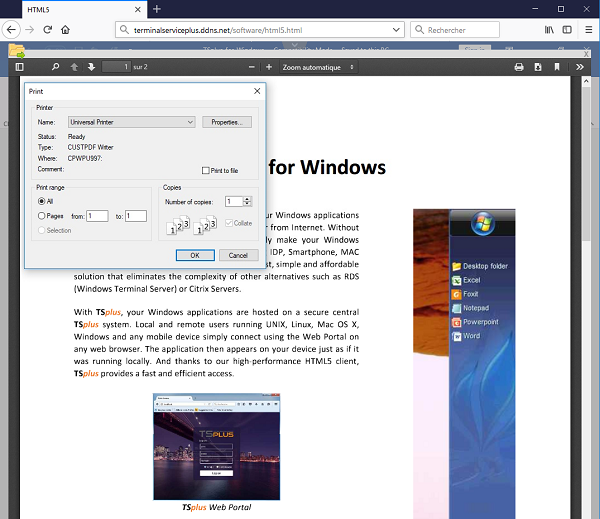
This PDF file is automatically pushed to the local PDF Reader of the user's workstation.
Each print job is opened as soon as it is ready on the user's local disk, without waiting for the previous Acrobat preview to be closed. The printing process starts only once the PDF is fully created on the client' side, which guarantees the print job starting without delay.

You can choose from 3 printing options on the Local Resources tab of the Portable Client generator:
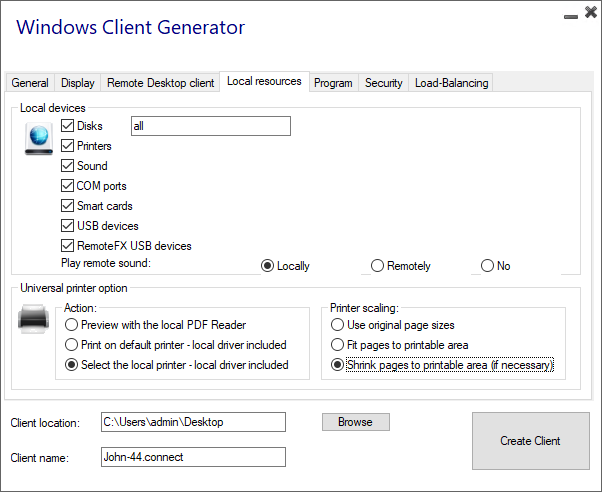
- Local PDF Reader preview: the document will be pushed and the local Acrobat Reader will open with the generated PDF file. The user can print it, or save a copy on his local disk drive.
- Print on the user's default printer: the document will be automatically pushed to the default user's printer (the local printing driver is included into the TSplus connection client). Key value : This option is to be used for people who have a lot of printing to do per day and use the same printer for this purpose.
- Select a local printer: The user can select one of his local printer (the local printing driver is included into the TSplus connection client).
If you do not have a PDF Reader installed on your machine, we recommend the use of Foxit Reader.
- If you wish to print on the default local printer with the system defined PDF reader instead of Sumatra, you can turn the setting "defaultsystem" on, on the generated client parameters, as explained on this documentation.
Customize page format printing
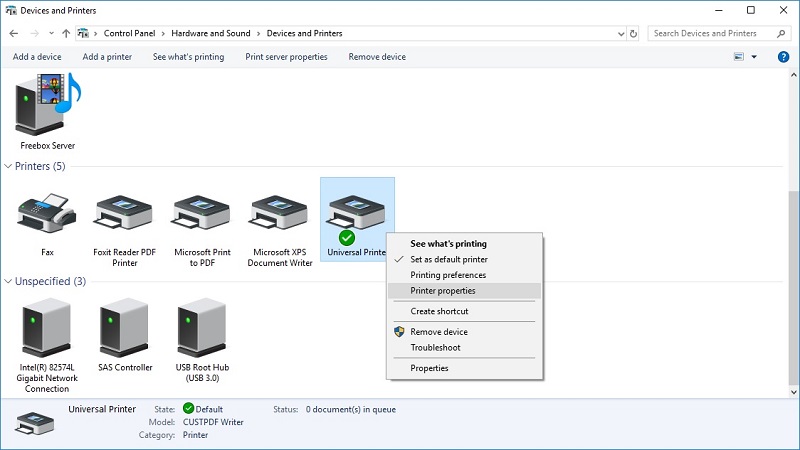
If you want to have a specific page format and your printer is not compatible with printer redirection, you can set the Universal Printer page format by opening the Devices and Printers menu of the Control Panel. Right click on the Universal Printer, then on Printer Properties::
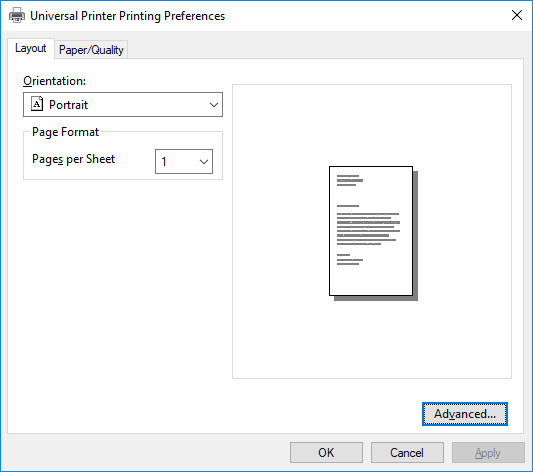
Click on Preferences, then on Advanced:
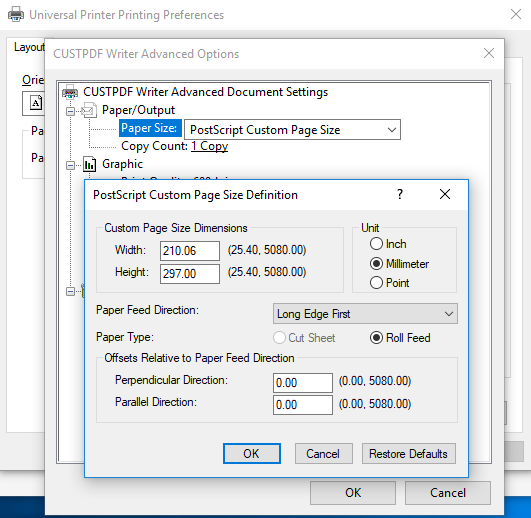
Go to Ghostscript PDF Advanced Document Settings / Paper Output / Paper size / PostScript Custom Page. Finally, click on Edit Customized Page Size and enter your preferred settings. This is especially helpful with receipt and label printers.
Sumatra default page scaling setting (noscale/shrink/fit) can now be set in Client Generator and remoteapp2.js file for remoteApp connection from Web Portal
You can specify from the Client generator which page scaling you want to be selected by default (None/Fit/Shrink), when printing using the universal printer. The default value of this setting is “Use original page sizes”.
You can also change this setting for remoteApp connection using the web portal, by changing the value of the variable remoteapp2_pagescaling in “remoteapp2.js” file located in “C:\Program Files (x86)\TSplus\Clients\www\software”.
• ‘noscale’ value is for “Use original page sizes” • ‘shrink’ value is for “Shrink pages to printable area (if necessary)” • ‘fit’ value is for “Fit pages to printable area”
var remoteapp2_pagescaling = 'noscale';
Note: If you are using these settings, please make sure that you are using, on your workstation, Connection Client version >= 14.30.0.71.